Manage Templates
Templates are starter Documents admins define so users can create new Documents quickly. Templates support Record Link, Live Field, and Related List placeholders that get resolved from the Source Record when a Template is instantiated to create a new Document.
Manage Templates in the Folio Admin page under the Document Templates section.
Access existing Templates
Access existing Templates in the table. From the right utility buttons on each row, you can:
- Edit the Template
- Clone the Template
- Delete the Template
- Copy the direct link to the Template (share with another admin)
- Copy the ID of the Template (you will need this if you want to automatically instantiate the Template from invocable Apex; see the Automate with Invocable Apex page for more details on this).
Only users with the Folio Administrator permission set can create, edit, or delete Templates. End users cannot create Templates; they can only instantiate Documents from Templates that an admin has already created.

Template Builder
You open the Template Builder by clicking the pencil Edit icon on any Template row, or by clicking New Template to start one from scratch. It works just like the Document editor, with a few additions specific to Templates.
The most important addition is the Source Object selector at the top of the editor header. Every Template must have a Source Object — it tells the instantiation process which records are valid as the Source Record for a new Document created from the Template. Even if the Template contains no Record Links, Live Fields, or Related Lists, the Source Record is still required: it becomes the default linked record on the new Document.
When a Template is instantiated, every Mention in the body (Record Links, Live Fields, Related Lists) is resolved in real time against the chosen Source Record, and that record is automatically linked to the new Document.
Creating a new Template
When creating a new Template, keep the following in mind:
-
1 Give your Template a descriptive Title. It’s what users see when picking a Template to create a Document from. New Documents are named
{Template Name} for {Source Record Name}(e.g. “Account Plan for Acme Inc.”), so avoid putting “template” in the Title — the resulting Document name reads more naturally without it. -
2 Optionally add Related Records or Tags. Whatever you set on the Template is applied to every Document instantiated from it.
- Tags are the common use: label Templates with Tags like “Account Plan” or “CS Handoff” so users can filter for them on the Folio Docs home page.
- Related Records is rarer but useful for static context — e.g. a Template only used for one key Account can be set to always link its Documents to that Account.
-
3 Templates support the full Document editor’s formatting — headings, bullet/numbered/task lists, quote blocks, code blocks, images, horizontal rules, tables, and hyperlinks. Use
/commands, keyboard shortcuts, or markdown shortcuts the same way as in a Document. See Formatting Documents and Use Keyboard Shortcuts for details.

Mentions
Mentions are the placeholders inside a Template that get resolved against the Source Record when the Template is instantiated.
Use the Mention Picker (recommended)
Mentions can be added into a Template using the picker fields at the top of the page. The @ shortcut for inserting Mentions does not work inside the Template Builder — it only works in the actual Document editor. In the Mention Picker, you select one of three Mention types:
- Record Link
- Related List
- Live Field
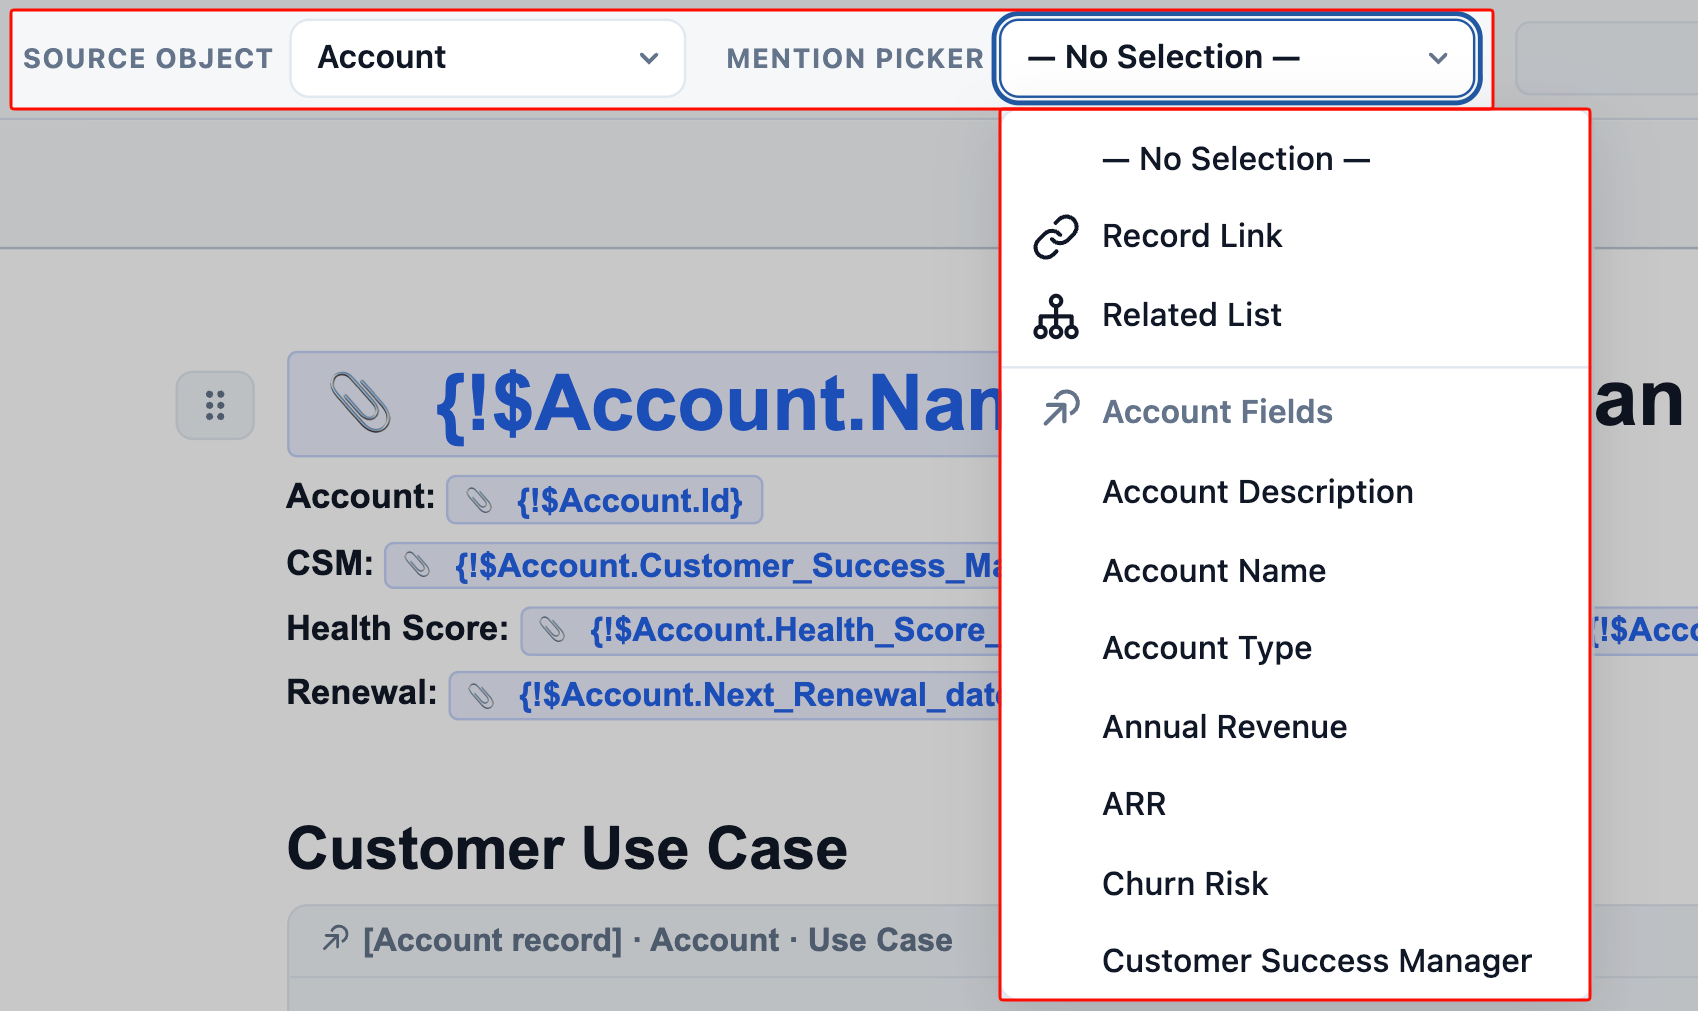
When Record Link or Live Field is selected, the formatted Mention syntax appears to the right of the picker, ready to be copy-pasted directly into the Template body.

When Related List is selected, a Related List Picker dropdown appears, where you select the child object and the specific lookup relationship the Related List should be rendered from. Once selected, the correct Mention syntax appears to the right and can be copy-pasted.

Visual confirmation in the Template body
How a Mention renders in the Template body once its syntax is recognized depends on the Mention type and the underlying field’s data type.
Record Links and Live Fields (standard data types). As soon as a Mention’s syntax is completed with the opening and closing curly brackets — {!$___} — it automatically turns into a blue chip in the Template body, indicating that the syntax has been recognized as a Mention. If your text stays as plain characters and never converts to a chip, the syntax isn’t valid yet.
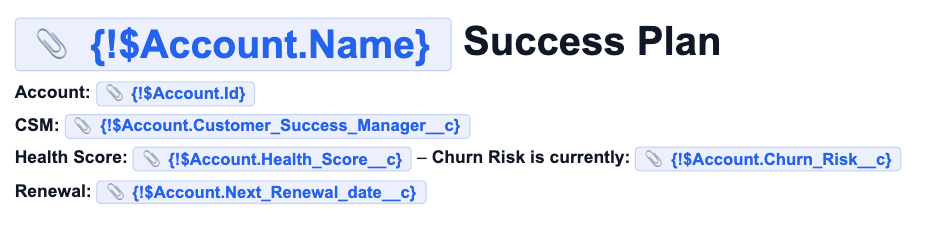
Live Fields to text block data types (Rich Text, Long Text, and Text Area). Live Fields pointing to fields of these data types render in the Template as a formatted block in the same style they will display in the instantiated Document, with placeholder text in the middle. When the Template is instantiated against a Source Record, that placeholder is replaced with the real field value from the record.

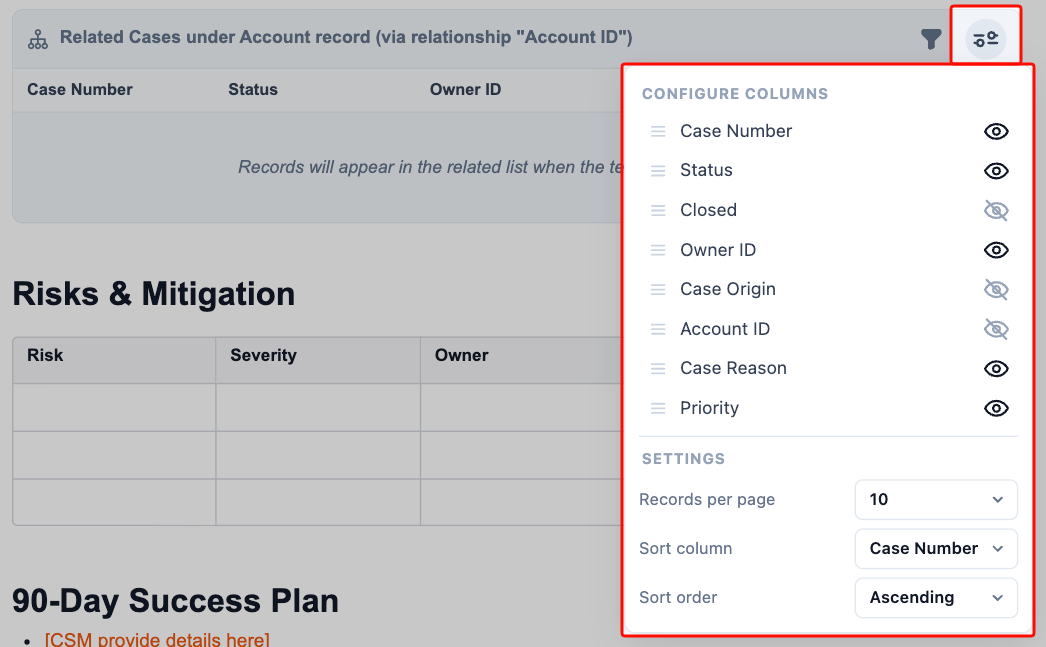
Configure Related List nodes
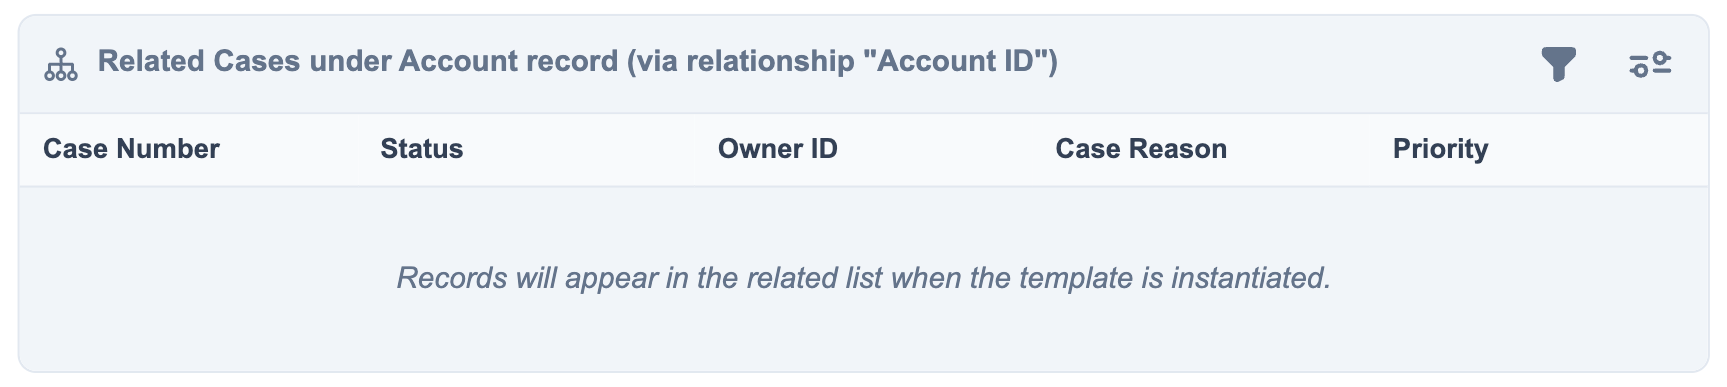
When a Related List Mention’s syntax is recognized, it renders in the Template as a formatted Related List block in the same style it will display in the instantiated Document, with placeholder rows in the middle. When the Template is instantiated against a Source Record, those placeholder rows are replaced with the real child records pulled from that Source Record.
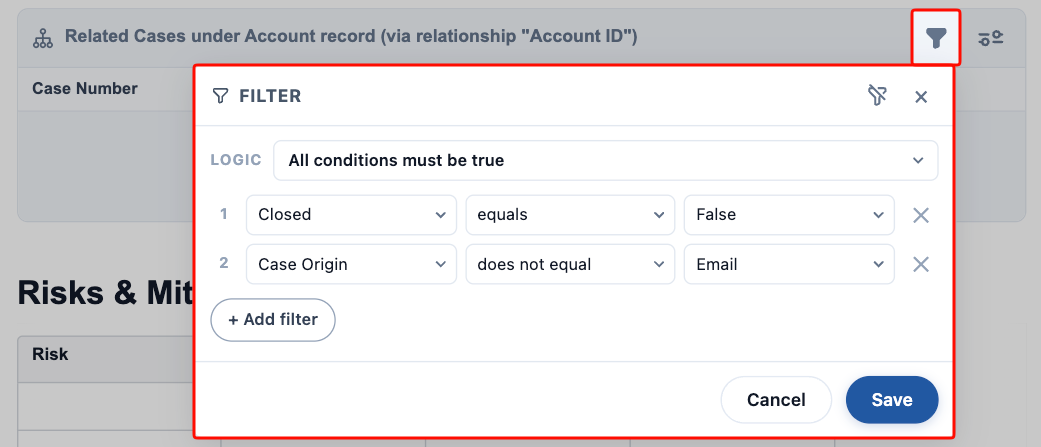
In the upper-right of every Related List node, two buttons let admins control how that Related List behaves when the Template is instantiated. Both Filter and Settings configurations are saved on the Template and respected at instantiation time.
Filters. Define up to 10 row filters using AND, OR, or custom conditional logic to control which child records appear in the Related List.
The Logic dropdown above the filter rows controls how those rows combine:
- “All conditions must be true” uses an
ANDoperator across every row. - “Any condition must be true” uses an
ORoperator across every row. - “Custom logic” lets you enter your own conditional expression using
(,), row numbers, and theAND/ORkeywords only. The syntax is validated before you can save your filters:- Every opening
(must have a matching closing). - Every filter row number you’ve defined must appear at least once in the logic expression.
- Any number entered in the logic expression must correspond to an existing filter row — you cannot reference a row that doesn’t exist.
- Every opening
Settings. Control the column layout and pagination of the Related List:
- Show / hide fields for the columns displayed. Only fields configured as Live Fields on the child object in the Folio Admin Panel are available to be shown.
- Records per page — choose 5, 10, 15, or 20.
- Sort column — choose which column the rows sort by.
- Sort order — Ascending or Descending.
Manual entry (advanced)
Admins do not have to use the pickers; they are there as a helpful guide. Admins can also manually type in Mention syntax directly. This is more advanced, and admins are responsible for entering the syntax correctly. If a manually entered Mention does not match a configured Linkable Object and Live Field, the Mention will not resolve when the Template is instantiated.
Any Mentions that fail to resolve when a Template is instantiated will be displayed as plain text and highlighted with a red background in the resulting Document, making them easy to spot.
For this reason, it is recommended to always use the picker to insert Mention syntax into a Template, unless you have a specific need to use multiple levels of dot notation (see below).
Always test your Templates to ensure all Mentions are resolving correctly before announcing them to your users or embedding them in an automated process.
Syntax reference
Record Link: {!$Object.Id} — where Object is the API name of the Source Object.
Related List: {!$ParentObject:ChildObject:LookupRelationship} — for example, to display a Related List of Cases under an Account, you would write {!$Account:Case:AccountId}, where Account is the Source Object, Case is the child object, and AccountId is the lookup relationship the Case uses to look up to the Account record.
Live Field: {!$Object.Field_Name__c} — where Object is the API name of the Source Object, and Field_Name__c is the API name of the target Live Field.
Multiple levels of dot notation (advanced)
As an advanced feature, multiple levels of dot notation are supported in Record Link and Live Field syntax. The Template instantiator will traverse the dot notation and take the final dot segment as the Record Link or Live Field to be resolved.
Critically, the final object and field in the dot path must be configured as a Linkable Object and a Live Field; otherwise the Mention will not resolve when the Template is instantiated.
For example, an admin could type {!$Object.SecondObject.ThirdObject.Field__c}, where Object is the Source Object. The instantiator will traverse the dot notation and resolve to the final segment. That means:
Objectdoes have to be configured as a Linkable Object: it is the Source Object of the Template, which itself must be a Linkable ObjectSecondObjectdoes not have to be configured as a Linkable Object: it is only an intermediate step in the dot-notation pathThirdObjectdoes have to be configured as a Linkable Object: it is the final object in the pathField__cdoes have to be configured as a Live Field onThirdObject
When resolved, the Mention will be inserted into the new Document as simply {!ThirdObject.Field__c}. The intermediate dot-notation steps are dropped once the final Mention value is resolved — the dot notation exists only to traverse the relationship path to the final destination.

Mentions and the instantiating user’s access
The user who instantiates a Template into a Document may or may not have object-, record-, or field-level access to every Mention referenced in that Template, and that is fine. The Template will still instantiate successfully and store the Mention path correctly in the new Document’s body, even when the instantiating user does not have access to the underlying record or field.
Folio respects Salesforce’s standard object-, record-, and field-level security out of the box — but that security model does not prevent Template instantiation from running. It simply means that if a user instantiates a Template (or later views a Document) that contains a Mention they don’t have access to, the Mention reference is stored in the Document body, but the Live Field value will not render for that viewing user. Any user who later views the same Document with sufficient access will see the Mention render normally.
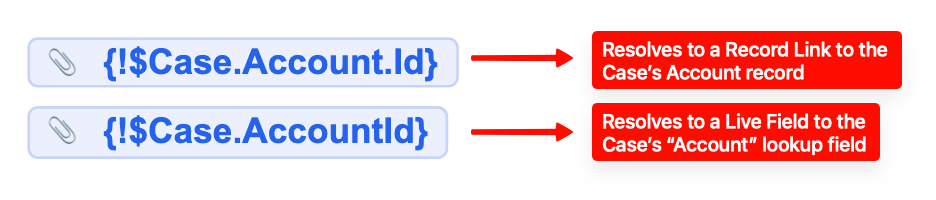
A subtle distinction: Id references
There is a subtle but important distinction between how Id dot values behave during instantiation.
If you are creating a Template with Case as the Source Object:
{!$Case.AccountId}refers to theAccountIdfield on the Case object, which is itself an Account lookup field. If this Account lookup field on Case is configured as a Live Field, then the lookup will be resolved as a Live Field of a lookup data type on the Document.{!$Case.Account.Id}is interpreted differently. Here,Caseis treated only as the dot-notation path to get to the final segment, which isAccount.Id. In this case,Idis the field being mentioned, pulled from the resolved Account, and anything that is*.Idis resolved as a Record Link, not a Live Field.
This means the same underlying record can be inserted as either a Live Field of a lookup data type or a Record Link depending on whether you reference the lookup field directly (Case.AccountId) or traverse to the related record’s Id (Case.Account.Id).
One reason you may opt for a *.Id (Record Link) over a *Id (Live Field of a lookup data type) is that any Record Link added into a Document is also used to automatically create a relationship to that record.
For example, if you insert {!$Case.Account.Id} in a Template, then {!$Account.Id} is inserted as a Record Link into the Document body when it is created, and a new relationship will be automatically created linking the new Document to that Account as well.
The Document is already automatically linked to the Case (since the Case is the Source Record and gets default-linked on instantiation). But if the Document also needs to be linked to the Account, then inserting the Account record’s Record Link will build that relationship for you automatically. The result: the Document will appear in the Folio Document Editor on both the Case record page and the Account record page, making it easy for people to find the Documents they need in context.
Mentions must match Admin Panel configuration
Mentions must be configured as Linkable Objects and Live Fields in the Admin Panel in order to resolve when the Template is instantiated. An admin can manually type in an invalid Mention syntax that looks correct in the Template but does not resolve at instantiation time.
For that reason, it is recommended to always use the Mention Picker to insert Mention syntax, unless you have a need to use multiple levels of dot notation. In that case, you must double-check that the final dot segment refers to an object and field that are set up as Linkable Objects and Live Fields.
Ways to instantiate a Template
There are two ways to instantiate a Template into a new Document:
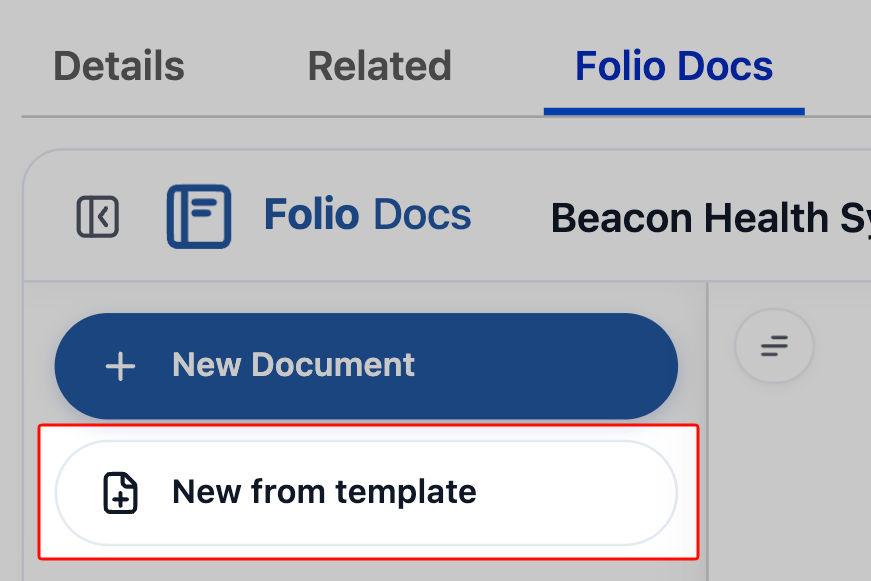
1. Manually from the UI
Users can click New from Template from either:
- The Folio Docs home page, or
- The Document editor on any record page
Users are first prompted to select which Template they want to create a Document from. Then, based on the Source Object of the selected Template, they are prompted to select a Source Record of that same object. The Template is instantiated immediately, and the new Document opens with all Mentions resolved.

2. Programmatically from invocable Apex
Admins can configure the Create Document from Template invocable Apex action to programmatically instantiate a Template from any kind of record trigger.
For example, when an Opportunity Stage changes to Legal Negotiation, you might want a Sales-to-CS Handoff Template to be instantiated automatically, so the sales rep can start filling in info to pass to the CSM when the deal closes.
See Automate with Invocable Apex for more on configuring this action in Flow.
Related: Configure the Admin Panel · Automate with Invocable Apex · Insert Mentions with @ · Create Documents from Templates